
Using REST module
This section contains a number of examples which illustrate various uses of the REST data configuration API.
The GeoServer REST configuration module uses the REST principles to expose services allowing to edit the catalog, in particular to manage workspaces, stores, layers, styles and groups.
The examples in this section use the cURL utility, which is a handy command line tool for executing HTTP requests and transferring files.
Open the Terminal, execute curl_shell.bat located in the $geoserver_data (%geoserver_data% in Windows) directory and enter the following command:
curl -u admin:Geos -v -XPOST -H "Content-type: text/xml" -d "<workspace><name>myworkspace</name></workspace>" http://localhost:8083/geoserver/rest/workspaces
the response should contains the following:
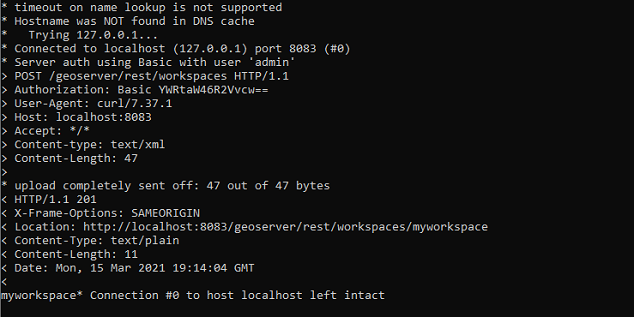
Create a new workspace via REST
Go to the
Workspacessection via Web interface to show the new workspace created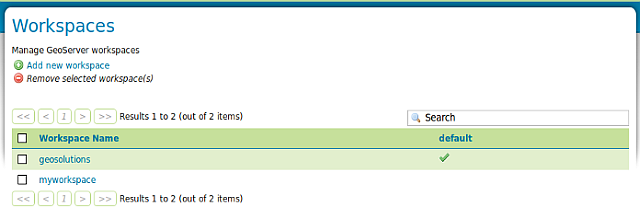
Showing the new workspace created
Get the new created workspace details entering the following:
curl -u admin:Geos http://localhost:8083/geoserver/rest/workspaces/myworkspace.xml
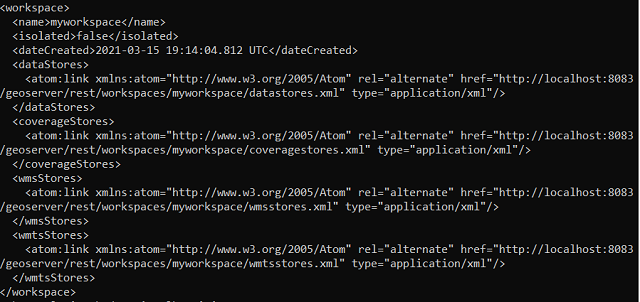
GET request to obtain new workspace details
Publish a shapefile using the
myworkspaceworkspace entering the followingLinux:
curl -u admin:Geos -H "Content-type: application/zip" -T ${TRAINING_ROOT}/data/user_data/pointlands.zip http://localhost:8083/geoserver/rest/workspaces/myworkspace/datastores/pointlands/file.shpWindows:
curl -u admin:Geos -H "Content-type: application/zip" -T %TRAINING_ROOT%/data/user_data/pointlands.zip http://localhost:8083/geoserver/rest/workspaces/myworkspace/datastores/pointlands/file.shp
Go to the Layer Preview to show the layers in a OpenLayers Map.
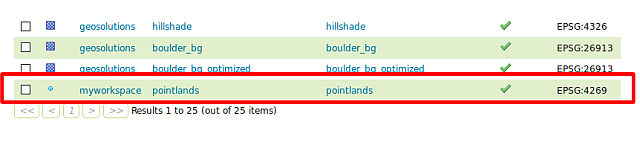
Showing the new created layer
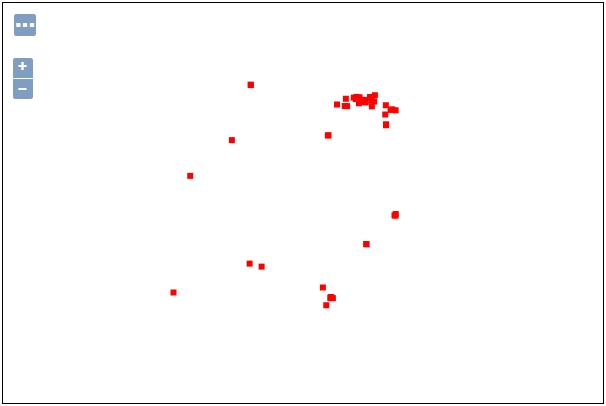
The new created layers
Note
If you previously followed the security portion of the workshop the layer won’t be accessible because the administrator does not have the required roles. Go back in the service security section and remove the rule limiting the GetMap requests.
Retrieves the created data store as XML entering the following:
curl -u admin:Geos -XGET http://localhost:8083/geoserver/rest/workspaces/myworkspace/datastores/pointlands.xml
<dataStore>
  <name>pointlands</name>
  <type>Shapefile</type>
  <enabled>true</enabled>
  <workspace>
        <name>myworkspace</name>
        <atom:link xmlns:atom="http://www.w3.org/2005/Atom" rel="alternate" href="http://localhost:8083/geoserver/rest/workspaces/myworkspace.xml" type="application/xml"/>
  </workspace>
  <connectionParameters>
        <entry key="url">file:${TRAINING_ROOT}/geoserver_data/data/myworkspace/pointlands/</entry>
        <entry key="namespace">http://myworkspace</entry>
  </connectionParameters>
  <__default>false</__default>
  <featureTypes>
        <atom:link xmlns:atom="http://www.w3.org/2005/Atom" rel="alternate" href="http://localhost:8083/geoserver/rest/workspaces/myworkspace/datastores/pointlands/featuretypes.xml" type="application/xml"/>
  </featureTypes>
</dataStore>
Note
By default when a shapefile is uploaded a feature type resource and the associated layer are automatically created.
Retrieve the layer as XML entering the following:
curl -u admin:Geos -XGET http://localhost:8083/geoserver/rest/layers/myworkspace:pointlands.xml
<layer>
  <name>pointlands</name>
  <type>VECTOR</type>
  <defaultStyle>
        <name>point</name>
        <atom:link xmlns:atom="http://www.w3.org/2005/Atom" rel="alternate" href="http://localhost:8083/geoserver/rest/styles/point.xml" type="application/xml"/>
  </defaultStyle>
  <resource class="featureType">
        <name>pointlands</name>
        <atom:link xmlns:atom="http://www.w3.org/2005/Atom" rel="alternate" href="http://localhost:8083/geoserver/rest/workspaces/myworkspace/datastores/pointlands/featuretypes/pointlands.xml" type="application/xml"/>
  </resource>
  <attribution>
        <logoWidth>0</logoWidth>
        <logoHeight>0</logoHeight>
  </attribution>
</layer>
Note
When the layer is created a default style named
pointis assigned to it.Create a new style named
landmarkswith the following SLD (using the GeoServer Admin UI):<?xml version="1.0" encoding="ISO-8859-1"?> <StyledLayerDescriptor version="1.0.0" xsi:schemaLocation="http://www.opengis.net/sld StyledLayerDescriptor.xsd" xmlns="http://www.opengis.net/sld" xmlns:ogc="http://www.opengis.net/ogc" xmlns:xlink="http://www.w3.org/1999/xlink" xmlns:xsi="http://www.w3.org/2001/XMLSchema-instance"> <!-- a Named Layer is the basic building block of an SLD document --> <NamedLayer> <Name>default_point</Name> <UserStyle> <!-- Styles can have names, titles and abstracts --> <Title>Default Point</Title> <Abstract>A sample style that draws a point</Abstract> <!-- FeatureTypeStyles describe how to render different features --> <!-- A FeatureTypeStyle for rendering points --> <FeatureTypeStyle> <Rule> <Name>rule1</Name> <Title>Red Square</Title> <Abstract>A 6 pixel square with a red fill and no stroke</Abstract> <PointSymbolizer> <Graphic> <Mark> <WellKnownName>triangle</WellKnownName> <Fill> <CssParameter name="fill">#66FF66</CssParameter> </Fill> <Stroke> <CssParameter name="stroke">#000000</CssParameter> </Stroke> </Mark> <Size>10</Size> </Graphic> </PointSymbolizer> </Rule> </FeatureTypeStyle> </UserStyle> </NamedLayer> </StyledLayerDescriptor>
Apply the existing
landmarksstyle to the layer createdmyworkspace:pointlands(this operation does not overwrite the entire layer definition, updates it instead):curl -u admin:Geos -XPUT -H "Content-type: text/xml" -d "<layer><defaultStyle><name>landmarks</name></defaultStyle><enabled>true</enabled></layer>" http://localhost:8083/geoserver/rest/layers/myworkspace:pointlands
Go to the Layer Preview to show the layers with the new
landmarksstyle.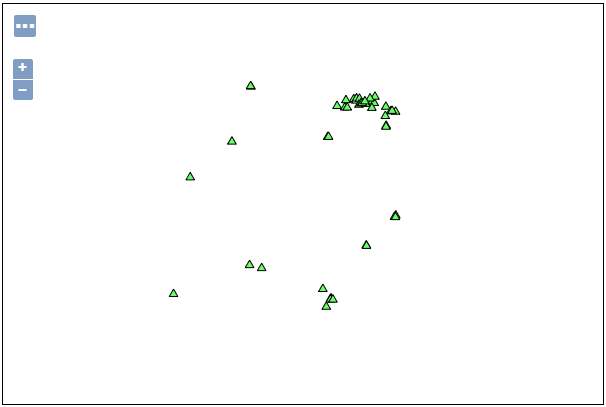
Viewing the layers with the new created style
landmarks