
Using the ImageMosaic plugin with footprint management
Introduction
This section describes how to associate a footprint to a raster dataset in GeoServer using the ImageMosaic plugin.
A footprint is a shape used as a mask for the mosaic. Masking can be useful for hiding pixels which are meaningless, or for enhancing only few regions of the image with respect to others.
This chapter contains two sub-sections:
- The first sub-section, Configuration, describes the possible configurations needed to set up an ImageMosaic with footprint.
- The second sub-section, Examples, provides examples of configuration of an ImageMosaic with footprint.
Configuration
A footprint can be linked to an Imagemosaic in three different ways:
- By using for each mosaic granule a Sidecar File, the sidecar must have the same name as the granule but an extension of
shp,wktorwkb. Ashpis going to be a shapefile with a single polygon record, awkta Well Known Text with a polygon/multipolygon, awkba Well Known Binary with a polygon/multipolygon. - By using a single Shapefile called footprints.shp which contains all the footprints for each granule; each feature contained in the shapefile represent a footprint for an Imagemosaic granule. Each footprint is associated to a granule with the location attribute;
- By embedding a raster mask in the TIFF file itself using GDAL mask support.
By using a file called footprints.properties, this option add more flexibility to the option number 2.
A configuration file, footprints.properties, looks as follows:
footprint_source=*location of the Shapefile or "raster" for internal raster masks*
footprint_filter=*filter on the Shapefile searching for the attribute associated to each granule*
So the user is free to decide the Shapefile name to use (not only footprints.shp) and the attribute to use for the footprint granule association adding also a custom filter for the content of that attribute.
The footprint.properties can be used also to hold other kind of configurations, see the Inset Support paragraph below.
For example if a Shapefile called fakeShapeFile stores the various footprints in a table like this, where each Name attribute is referred to a granule file:
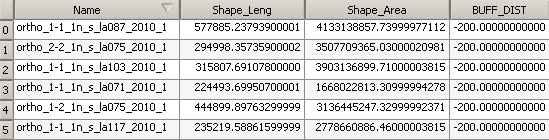
And the associated granules are:
- ortho_1-1_1n_s_la087_2010_1.tif
- ortho_2-2_1n_s_la075_2010_1.tif
- ortho_1-1_1n_s_la103_2010_1.tif
- and so on ...
The associated footprints.properties file must be like this:
footprint_source=fakeShapeFile.shp
footprint_filter=Name=strSubstring(granule.location, 0, strLength(granule.location) - 4)
The substring operation is done for comparing the footprint attribute names and the granule names without the .tif extension. Standard GeoServer Filter Functions can be use in this expression. A complete reference for them can be found here.
Footprint Behaviours
There are three possible behaviours for Footprint:
- None: simply doesn’t use the Footprint and behaves like a standard ImageMosaic layer;
- Transparent: adds an alpha band of 0s on the image portions outside of the Footprint making them transparent, typically used for RGB data;
- Cut: set the background value on the image portions outside of the Footprint, typically used for GrayScale data.
The behaviour must be set directly on the Layer configuration page.
Inset Support
Another feature of the Footprint is the possibility to calculate an Inset on the vector footprint prior to applying it to the image. With the Inset a shrinking of the footprint is applied, typically for removing compression artefacts or any nasty effect at the borders. The inset can be activated by adding the following code inside footprints.properties:
footprint_inset=*value in the shapefile u.o.m.*
footprint_inset_type=*full/border*
- Full inset type calculates the inset for each footprint side
- Border does the same operation but those straight lines that overlap the image bounds are avoided; this last parameter is useful for images already cut in a regular grid.
Each modification of the footprints.properties file requires to Reload GeoServer. This operation can be achieved by going to Server Status and clicking on the Reload button on the bottom-right side of the page.
Examples
The two datasets used in the following can be found into
- Linux:
$TRAINING_ROOT/data/user_data/footprint_data- Windows
%TRAINING_ROOT%\data\user_data\footprint_data
The content of the footprint_data is:
- The first dataset, mosaic_single_tiff, contains a Shapefile called srtm_boulder.shp which represents a mask to use on the Boulder (Colorado) layer inside the
$TRAINING_ROOT/data/user_data/boulder( or%TRAINING_ROOT%\data\user_data\boulderfolder and can be used for testing footprint configuration with a Sidecar File.- The second dataset, mosaic_sample, is a mosaic which represents Italy and is used for testing the other two configurations.
Here are presented a few steps for configuring a new ImageMosaic layer with footprint.
1. Vector Footprint configured with a sidecar file
Here the steps to load am Imagemosaic with a sidecar file as a vector footprint.
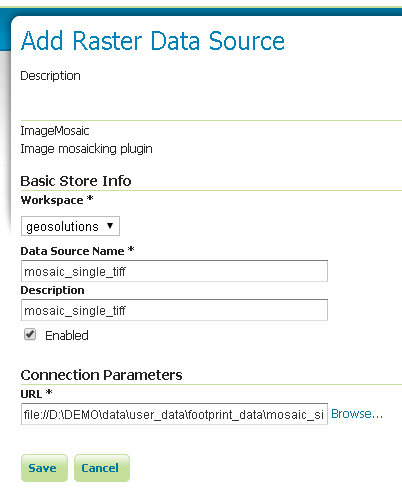
Step 1: Create a new ImageMosaic Layer
As seen in a previous chapter an ImageMosaic data store can be created by going to .
Load the mosaic_single_tiff folder, from the TRAINING_ROOT folder navigate to \data\user_data\footprint_data\mosaic_single_tiff
Publish a Layer from that store going to , choosing the name of the data store created above and then clicking on the publish button.
Step 2: Configuring a new Layer for the Mosaic
Warning
fill the field Declared CRS with the value EPSG:4326 if the CRS is not automatically set.
The layer will be rendered depending on the value of the FootprintBehavior field:
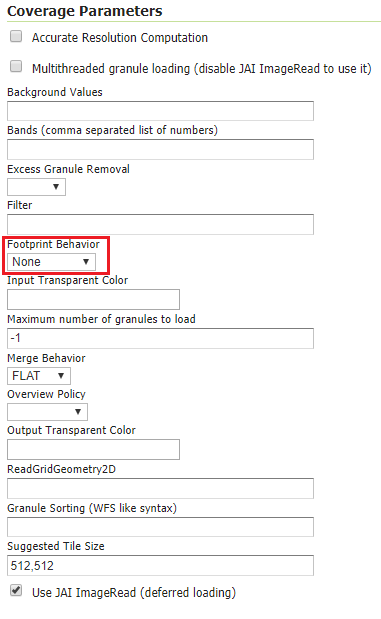
The user can set one of the three values for the Footprint behaviour as described above (None, Transparent, Cut).
After that, the user must confirm the modification by clicking on the Save button on the bottom side of the page.
Step 3: Example Results
Here are presented the results for each dataset.
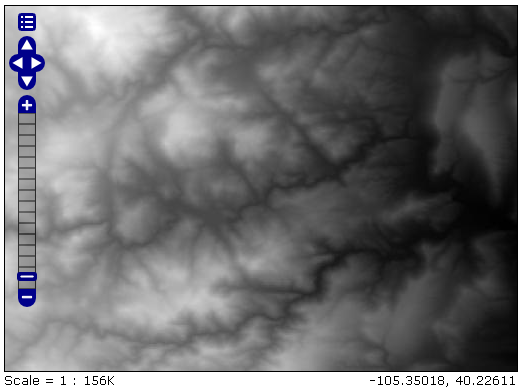
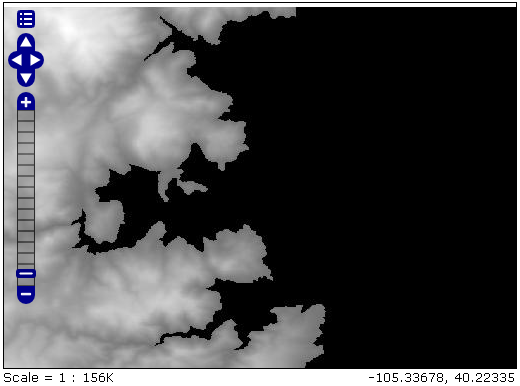
This is an example of mosaic (mosaic_single_tiff) without applying Footprint:
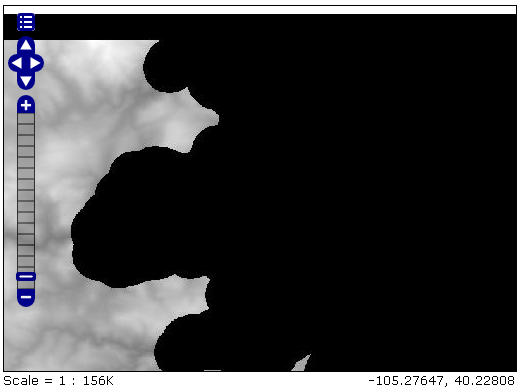
And this is the result of setting FootprintBehavior to Cut:
Then navigate the filesystem in the mosaic directory, open (or create it if not exist) the file footprints.properties and write:
footprint_inset=0.01
footprint_inset_type=full
to add an inset.
Note
Remember that each modification on footprints.properties requires a GeoServer catalog and a GeoServer resource cache reloading in order to apply the changes.
If an Inset is added, the final mosaic is:
2. Vector Footprint configured with footprints.shp
Repeat the steps described above but loading the mosaic_sample folder from %TRAINING_ROOT%\data\user_data\footprint_data\mosaic_sample
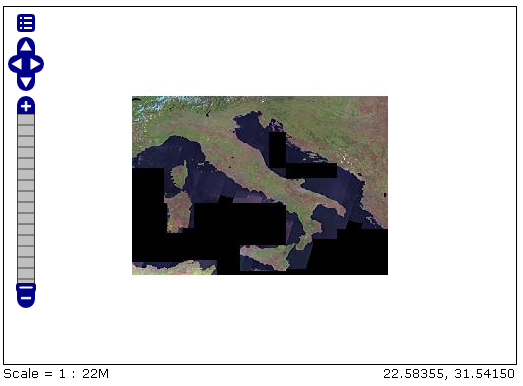
This is another example of mosaic (mosaic_sample) without Footprint:
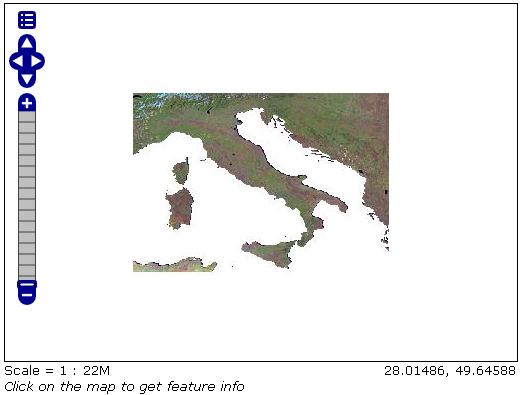
And now after setting FootprintBehavior to Transparent (no Inset is used) on the Layer:
3. Vector Footprint configured with footprints.properties
For testing this functionality the user must
Clone the directory
%TRAINING_ROOT%\data\user_data\footprint_data\mosaic_sampleand call itmosaic_sample2Rename all the footprints.xxx files that compose the shapefile to mask.xxx (don’t rename footprints.properties too!) and load another ImageMosaic datastore.
open (create if not exist) the footprints.properties file and write:
footprint_source=mask.shp
footprint_inset=0.00001
footprint_inset_type=border
In order to specify an inset and use a footprint shapefile with a custom name.
- Then publish the imagemosaic located in the cloned directory called
mosaic_sample2
The result of setting FootprintBehavior to Transparent, Inset type to border and Inset value to 0.00001 is:
